Monday, 26 April 2010

Cream of Pumpkin Soup

I just made Cream of Pumpkin soup today. It was so good that Edna had second helpings and was ready to call one of our friends to tell her how yummy it was! lol!

I'll put up the photos once I've downloaded them. =)

Cream of Pumpkin Soup:
Ingredients:
At least 1/2 a medium pumpkin
1.75 litres water

60g Celery (finely sliced)
3 cloves Garlic (chopped)
1 large Onion (chopped)
1 potato, 1cm cubed
30g butter
40g flour
2 Knorr chicken cubes

1 tablespoon rolled oats
200ml UHT milk
1 tbsp sugar
Pepper to taste

Method:
1. Boil 1.75 L of water.

2. Clean out the pulp of 1/2 a pumpkin, reserve the seeds to toast for a snack. No need to remove the pumpkin skin, but cut the pumpkin to about 1 inch pieces and toast them in the oven for about 20-30 minutes until the pumpkin is soft. Toasting the pumpkin caramelises the sugar in the pumpkin for a lovely sweetness. =)

3. Once the pumpkin is soft, the skin can be removed easily. Put the pumpkin into a food processor or blender, but don't start blending yet!

4. In a frying pan, melt the butter and fry the onion, garlic, potato and celery until soft. To this mix, reduce heat slightly and add the chicken cubes and flour and stir thoroughly for about 1 or 2 minutes. Add some of the hot water until you get a thickened watery mixture. Add in the oats, but you don't need to cook it further.

5. Put this thickened mixture into the food processor or blender, and blend it with the pumpkin. If needed, you can add more hot water.

6. Pour the blended mix back into the soup pot, add in the rest of the hot water, milk and sugar, then turn up the heat.

7. When the soup is boiling, put it back into the thermal pot for a time to let the flavours mix. You do not have to reheat the soup before serving.

8. Freeze or refrigerate whatever soup not consumed.

Yes, the soup base is like that of my Broccoli Soup, so if you're familiar with that easy to make soup, this is just as simple to make, healthy and so good to eat. =)

Friday, 9 April 2010

Oh Wow Oh My Caramel Popcorn


Basic Popcorn is so easy to make and is such a fantastic low-calorie snack. Unlike the popcorn you buy at cinemas, you get the option of how much butter and salt to add. However, there's nothing... absolutely nothing like crispy, caramel-coated bites of calorie-laden popcorn to tantalise those tastebuds.

To make popcorns, it's a simple 2 ingredient method:
In a medium saucepan with lid, pour in about 1 tablespoon of oil (I use Canola) and about 3 tablespoons of corn kernels. You can buy these corn kernels from the dry goods section of NTUC or most supermarkets.

Close the lid on the saucepan, and put the pot on medium heat. Shake the saucepan gently to coat the kernels with the oil, until you hear or see (if you're using a glass lid) the sound of a popcorn popping. Continue shaking the pot until the popping sound slows down to about 2 seconds between each pop. Remove the popped corns into a fresh bowl and if there are still unpopped kernels, you can return those to the heat.

If you like, you can melt some butter and salt and drizzle the mixture over the popcorn. Otherwise, you could try this easy "Oh Wow Oh My" Caramel Popcorn.

For 100g of freshly popped popcorn,

Ingredients
50 g salted butter
200 g brown sugar
55 ml corn syrup
1/2 tsp baking soda
1 tsp vanilla extract

Method
  1. Preheat oven to 95 degrees C. Place freshly popped popcorn in a very large bowl in the oven to keep warm.
  2. In a medium saucepan over medium heat, melt butter. Stir in brown sugar, corn syrup and salt. Bring to a boil, stirring constantly. Once sugar has melted, boil without stirring for 4 minutes. This will make the caramel crispy later.
  3. Remove from heat and stir in soda and vanilla. Pour in a thin stream over popcorn in the bowl and stir well to coat.
  4. Place in a large shallow baking sheet and bake in the preheated oven, stirring every 5 minutes, for about a minimum of 15 min. The original recipe calls for stirring every 15 minutes for an hour, but I was in a hurry and the kids were impatient for the treat. ;P
  5. Remove from oven and let cool completely before breaking into pieces. This is very important, otherwise the popcorns will be too hot and sticky. Waiting until it cools makes the treat less sticky.
That's all for now... enjoy the treat! =)


Sunday, 4 April 2010

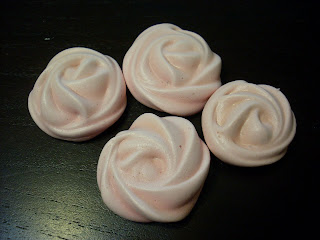
Rose Meringue Cookies


These cookies are so simple to make and they taste so sweet and light.

Ingredients:
90g Egg White
175g Caster Sugar
1/2 tsp Cream of Tartar
1 tsp Rose Essence
2-3 drops red food colouring

Method:
1. Beat egg white in mixer until frothy, then add in the cream of tartar.
2. Beat the egg white until soft peak appear, then add in the sugar tablespoon by tablespoon so that it mixes in and dissolves. You'll want your egg white to look stiff and glossy.
3. Add in the essence and colouring.
4. Pipe the egg white onto a lined baking sheet in swirls to look like rosettes.
5. Bake in a pre-heated oven at 120 deg celsius for about 60 minutes, turn off the oven and leave it in there for another 60 minutes.

Store in an air-tight container.

You could make variations of these meringue cookies, limited by your store of essences and imagination. Instead of rose essences, you could use lemon or lemon essence for a lemony meringue cookie. Just remember that it's a sweet treat, so your essences need to have a citrusy base or a fruity base to work. ;)

Amaretti


These are delicious Italian Almond biscuits made with ground almond, egg white and sugar - no flour, so they're gluten-free! =)

I had lots of egg whites frozen from my CNY bakes, so it was a cinch to make these cookies for Easter.

Ingredients:
60g Egg White
250g Ground Almond (bought from Phoon Huat)
200 grams Castor Sugar that has been processed through the food processor
1/2 teaspoon Almond Essence (optional)

Method:
1. In a mixer, add the ground almond and castor sugar and mix for 1 minute.
2. Into the mixer, add the egg white in 3 batches, until everything comes together.
3. Roll the sticky dough, teaspoonful by teaspoonful onto a lined baking tray.
4. Pop it into a pre-heated oven at 190 degrees C, for about 5 minutes, or until the cookies have risen, are a deep golden color and have tiny cracks.
5. Remove from the oven and cool on a rack. When cool gently peel cookies from the baking paper. If they stick, turn the paper over, take a damp paper towel and gently wipe the bottom of the parchment paper to loosen the cookie.

Recipe adapted from: http://www.joyofbaking.com/AmarettiCookies.html

This cookie keeps well and usually taste better a few days after baking... if they can last that long. ;p