Sunday 11 December 2011

Durian Puff!


It's durian season, and what more lovely way to eat it (apart from eating it fresh), is to feast on it in a Durian Puff?

The Puff or Choux Pastry is so simple to make - it took less than 15 minutes to gather the ingredients and ready, and then it's simply just a matter of piping and popping it into the oven to puff up, and then to cool it down, ready to be filled with a creamy durian filling.

In fact, you don't have to use a durian filling - any sweet or savoury filling would taste good in the puff pastry!  I've done tuna-mayo filling, custard filling, lemon custard filling and whipped cream filling... and they were all yums! ;)

Pastry
Ingredients:

1 cup hot water
1/2 cup butter
1 cup flour
4 eggs

Method:
  1. Set your oven to 220degC.
  2. Boil the water and butter in a saucepan.  When the mixture is boiling, turn off the heat and immediately pour the flour in and stir.  Be careful though - the mixture would boil up as the flour goes in, but once the flour gets in, the mixture would settle.  Stir the mix until all the flour is absorbed and the mixture doesn't stick to the sides of the saucepan.
  3. If you have a mixer, pour this hot mixture carefully into the mixer, and while the mixer is on, put one egg at a time into the mix.  Make sure that the egg is incorporated into the mix before adding a new one. The mixture is hot, so to prevent the eggs from cooking/curdling, you'll have to mix each egg into the mix fast.  If you don't have a mixer (go buy one! ;P), you can mix each egg into the mix quickly, and you'll develop lovely toned arms for the efforts! ;)
  4. Once the eggs go into the mix, and you get a lovely, smooth, shiny mix, just put the mix into a pipping bag and pipe the mix into the size and shape of the puff pastry you want.  Pipe them onto prepared baking sheets lined with baking parchments.  Remember to give lots of space between your mix because these puff pastry aren't called puff pastry for nothing! ;P
  5. Into the oven they go, for at least 20 minutes (or until they turn golden brown).  Refrain from opening the oven early - all those lovely steam from the mix helps to cook the pastry and make it crisp and hold up the shape.
  6. Once it's done, cool the pastry down before filling it up with your choice of yummy fillings. 

    Because I add whipped cream and sugar to taste for my durian fillings, I don't usually need to buy the most expensive durians for making these pastries.  Essentially, I need the durian creaminess and fibres to give the Durian Puffs its features, and durian varieties are such that you get a gamut of sweet to bitter durians, so take my recipe and tweak it to your personal satisfaction. ;)

    Durian Filling
    Ingredients
    600g Durian flesh
    300g Whipping Cream
    Icing Sugar to taste

    Method:
    1. Whip the whipping cream until its texture is thickened.
    2. Add in the durian flesh and mix well.
    3. Add icing sugar to taste.
    4. Use a pair of scissors to cut any durian fibres that are too long or clumpy.  This helps achieve a smoother filling.  But don't cut the fibres too fine - you still want to have some satisfaction of having a durian mouth-feel. ;)
    5. Chill filling in the refrigerator until needed.


    I pipe the durian into the pastry from the thinnest part of the pastry.  Once done, I put it in the fridge to chill and set.
    A light dusting of icing sugar to dress it up! ;)
    Durian Puffs with Malteasers eyes! lol!
    A Trio of Durian Puff Friends! ;)
    Simple, quick and so yummy to feast on! ;)

    Thursday 27 October 2011

    Air-fried Chicken Chop


    I bought a Philips Air Fryer about 2 weeks ago, and was inspired to try modifying a baked crispy chicken recipe.

    The initial recipe can be found here, but I felt that the baking time of 60min is too long for boneless chicken parts.  Anyway, the idea of using mayonnaise as a coating base appealed to me - it sounds perfect as a coating base for the Air Fryer.

    The Air Fryer works like a mini-oven, but with a better air-circulation, thus ensuring that food is cooked on all sides evenly.  Unlike oven baking, where one side is usually heated more than the other, and there is a need to flip the food, the Air Fryer eliminates this need.

    Anyway, this is my easy version of Air-fried Chicken Chop:

    Ingredients
    Filet of Chicken
    Herb, Spices & Salt for marinate
    Mayonnaise (I used my homemade mayo)
    Crushed Cream Crackers mixed with pulverised Oats (but you could use Breadcrumbs or panko)

    Method

    1. Use a meat hammer to flatten the chicken.  Doing so not only ensures that the meat has an even thickness so cooking is even, but it also tenderises the meat.  Then, marinate the chicken with your favourite blend of herbs and spices and salt.  Try to keep it a dry marinate.  For this particular version, I used dried oregano, basil, paprika and pepper.  You don't have to marinate it long - about 10 minutes will do.  However, if you want to marinate it longer, it's up to you. ;)

    2. Because it was a dry marinate, dipping it into a mayo undercoat ensures that the chicken is evenly coated.  After the mayo dip, dip the chicken into the Cracker mix.


    3. Put the meat into the Air Fryer basket, and fry the chicken for 10 minutes at 180degC.

    And that's it... crispy coated chicken, with a moist, tender texture.  Yummy, simple and if you're using homemade mayo, heart-healthy oils. ;)


    Edna's Chicken Chop with Mashed Potato
    Adult version

    This is the full meal - mashed potato with herb butter, and Fresh Tomato Soup.
    The chicken chop can be made smaller like nuggets, or served as a main course, or even between bread or in a bun like a chicken burger. ;)

    Sunday 23 October 2011

    Heart-healthy Roasted Garlic Herb Butter


    This is so easy to do and the end result is so delicious and its impact on your plate and palate is so WOW!

    Ingredients:
    1 bulb roasted garlic (Don't peel the garlic.  Just remove as much of the outer skin as possible and put the entire bulb in a toaster oven for about 10 minutes.  Once the garlic is done, let it cool, and then squeeze the individual garlic out of its pod.  Trust me, it's less messy this way. ;) )
    1/3 cup olive oil
    1 block butter soften to room temperature
    Any favourite herbs, fresh or dried (I have a pot of rosemary plant, and I used one stalk for this, along with dried oregano, basil, paprika and pepper)
    Salt to taste

    Method:
    1. Blend the roasted garlic with the olive oil and other herbs.
    2. Put the butter in to blend well.
    3. Done!
    The butter mix is now very soft because of the addition of the olive oil.  This is actually good because it means that spreading the butter on bread for garlic bread would be very much easier.  Also, if used by itself to accompany potatoes or meat, the butter would melt to the food faster.  However, it doesn't look too appetitising to put a dollop of the butter mix on food, does it?  So, take it a step further, and whip out your pretty IKEA ice-trays...


    I find it a challenge to scoop the butter into the trays and get it into the crevices, so I use my piping tube to help me out:


    Then I pop the ice tray into the freezer overnight and then to save freezer space, I take out the frozen cubes and arrange them in an air-tight freezer container, separating each layer of butter with plastic wrap:


    Aren't they pretty?  And since they're made in advance, all I need to do is to just arrange them on a plate to serve with warm rolls, or on top of a hot juicy steak or a nice fillet of fish. ;)

    Don't forget to keep them in the freezer so that they maintain their lovely shapes. :)

    Almond Biscotti

    I just bought a Dolce Gusto to make lovely lovely Cappucino at home.  And what better to accompany that perfect cup of coffee than a slice of crisp, almond biscotti?


    I had this recipe for ages - ripped off a Popular Bookshop Magazine, POPclub, years ago, but never had the impetus to actually make the biscotti until today. :)

    I'm retyping the entire recipe here, and will comment on it after:

    Ingredients:
    120g Plain flour (sifted)
    a pince of salt
    3 egg whites
    100g caster sugar
    1tsp vanilla essence
    180g unblanched almonds

    Method:

    1. Beat egg whites with salt until form.  Gradually add in castor sugar and vanilla essence.  Beat until it thickens.
    2. Add in flour and almonds.
    3. Spread mixture into a well-greased 18cm by 18cm square tin.
    4. Bake for 20 to 25 min at 170degC until light brown.
    5. Remove and place it on a wire rack to cool.
    6. Wrap dough with foil and keep for 2 days under room temperature.
    7. Cut the dough into thin layers, and place a single layer onto a baking tray.
    8. Bake in oven 160degC for 12 to 15 minutes or until it is dry and crispy.
    Comments:
    I didn't have 3 egg whites - only two because I used the yolk for baking 2 pies.  Therefore, I reduced all the ingredients proportionally.  Also, I didn't have a 18cm by 18 cm square tin, and so I used a 16cm circle tin, which I sprayed with oil.

    After baking and cooling, I wrapped the cake/bread in an aluminium foil, and put it into a non-airtight plastic box because I was concerned about ants. ;)  After 2 days, I sliced into thin (but I think I could slice it even thinner if I had a sharper knife... too lazy then to sharpen it. ;P) slices and pop it into the oven.  It took longer than 15 minutes to get crispy, but the texture is nice - not very sweet - and perfect to pair with a hot cup of aromatic coffee. :)

    Saturday 1 October 2011

    Ice... Cream Cake?

    It being Children's Day, it would be the perfect time for cupcakes and ice-cream... only in this heat, how could an ice-cream retain its shape?  Ah-ha!  The perfect solution then: an "Ice" Cream Cupcake! ;)


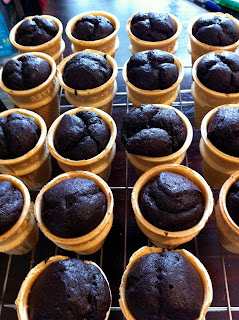
    This is really an easy and fun project for the kids to do too.  I started out with a flat bottom ice-cream cone wafer.  Flat bottom, because I wanted to end up with a cake that looked like McDonald's Vanilla Cone, and also because it would be less of a hassle to bake.

    I used my favourite chocolate cupcake recipe and poured it into the cups.  I used the muffin tray to help hold the cones evenly separated.  With the recipe, I was able to make 18 cones.


    Next, I made a perfect buttercream for this weather: Swiss Meringue Buttercream.

    I discovered this recipe while looking for a better buttercream recipe, and this was the result.  Swiss Meringue, because of the way it cooks the egg whites, creates a buttercream that holds well in our hot and humid weather, and yet has a silky, creamy texture - much like a soft, creamy marshmallow. *dreamy sigh*


    Instead of posting up the how-to, here's a video of how simple it is to make:


    Although the ratio for the eggwhite:sugar:butter is 1:2:3, I actually used 70g egg white (from 2 eggs), 125g sugar and 200g butter.

    After the cake was cooled, I covered the top with the cream and then piped the soft-swirl look on the cones...

    And ta-da!

    Happy Children's Day, young and young-at-heart! =)

    ETA (2 March 2012):
    I made this again, on my Girl's request that I make it for her Birthday.

    Instead of using the SMBC, I just used a plain meringue frosting.  The frosting held up better and was much easier to pipe.  I used about 1:1 amount of eggwhite to sugar, and added vanilla for the white cones and added strawberry emluco for the pink ones. :)

    The Meringue frosting kept better and was better received by the kids.  It tasted like marshmallow. ;)
    I used these baskets, and sewed fishing lines across to hold the cones apart.  It also stabilised the cones so that I could carry it to school.
    I used another basket to cover the bottom basket, and taped the sides to secure.  The blue baskets were later used to elevate the cones for display.

    Happy 6th Birthday, Beautiful Girl! :)
    I used 6 'Happy Birthday' tags to jazz up the cakes.  With cones, displaying them is a bit difficult.  I had a '6' candle that's at the table, which you can't see in this pic.  The pink and purple cloth are recycled from last year's display, and they are hiding the blue baskets. ;)

    Tuesday 27 September 2011

    Got a minute? Let's make Mayonnaise!


    This may look like a lot of ingredients, but it really only has 4 - and is so simple to make with a great leeway for variations.

    This is the famous Masterchef Australia Food Processor Mayonnaise Recipe that I used.  It's really quick, simple and you get something that tastes a whole lot better than the store-bought mayo. ;)

    Basically, you only need:
    1 egg
    2 tsp Dijon mustard
    1 tbs white balsamic vinegar
    A little salt
    1 cup olive oil

    I love it that I don't have to use only the egg yolk for this recipe because I hate having to store the whites and think about what to use it for... more meringue perhaps? ;P

    I didn't have Dijon mustard or balsamic vinegar, so I substituted it with Mild American Mustard and Apple Cinder Vinegar.  Also, I don't really like the heavy olive oil taste, so I had about 1/3 cup of olive oil for its goodness and 2/3 cup of canola oil for its non-taste. (Non-taste? Hmm... ;P)

    Into the food processor the egg, mustard, vinegar and salt went.  15 seconds to process it into a mixture; in goes the olive oil, 15 seconds to process it into a liquid paste; in goes the rest of the canola oil, and 30 sec to whip it into a creamy textured mayonnaise.

    Ta-da!

    Simple and delicious! 

    By the way, the food processor you see in the pic is about as old as Ethan - about 11+ years now.  It's a beautifully hardy processor, used almost daily when Ethan was a baby to puree his baby food.  It's been used often to process and puree many things in the kitchen from spice pastes to chopping nuts to making milkshakes for the kids... and it's cheaper to buy today than when I bought it years ago. ;)

    Thursday 23 June 2011

    Orange Cake in a Blender


    When I first saw this cake baked by a lovely lady, I was intrigued - a cake that was made in a blender!  Jam's photography made the cake look so drooling-good that I knew I had to try my hands at making this cake... and what an utterly quick and easy cake to make it turned out to be!  If you can measure out the ingredients, mix in the flour, and pop it into the oven, you're well on your way to savouring this cake! ;P


    Orange Cake in a Blender
    Ingredients:
    1 large Orange (cut into quarters, and half it again.  Remove seeds and the white plith where possible.  No need to remove the skin - easy right?)
    1 cup Sugar
    1 cup Oil (I used Canola oil)
    3 Eggs
    2 cups all-purpose flour
    1 tbsp baking powder

    Method:

    1. Sift the flour and baking powder together.
    2. Using a blender, blend the orange, sugar, oil and eggs until smooth.
    3. Add the blended mixture to the flour, and mix them well together.
    4. Pour the mixture into greased pan.
    5. Bake in a preheated oven, 150 deg C for 40 minutes.


    The cake has a very light orangey fragrance and is a perfect quick afternoon tea-cake.  It's absolutely beautiful with tea. :)

    Absolutely yummy and did I mention how easy it is to bake? ;)


    ETA:
    I just melted some choc and poured over this cake... and the effect is oh WOW!  The choc just adds a whole different dimension to the fragrance of the orange cake... mmmm perfect!

    ETA (14 June 2012):
    I've tried another recipe of this cake, and it yielded a very good texture too.  It uses butter instead of oil, and self-raising flour instead of the plain flour+baking powder.  I used this recipe to help a friend bake a cake for her 12-month old daughter, so that the Birthday girl could cut and eat the cake with her family for her 1st Birthday. :)


    Ingredients:
    1 orange, chopped roughly into small pieces (cut into quarters, and half it again.  Remove seeds and the white plith where possible.  No need to remove the skin.)
    1 1/2 cups self-raising flour
    1 cup sugar
    3 eggs
    180g butter, melted
    Icing sugar for dusting
    **If baking for older kids, add about a teaspoon or two of Cointreau for a brighter fragrance)

    Method:


    1. Preheat the oven to 180°C. Line a round cake tin with baking paper and set aside.
    2. Place the orange into the blender and blend until it's mushy.
    3. Add the flour, sugar, eggs and butter and blend until just combined.
    4. Pour into the baking tin and smooth surface. Bake for 40-45 minutes or until a skewer pushed into the centre comes out clean.
    Made in a 9-inch springform pan.

    Frosted with Orange Icing.  Basically,  250g icing sugar mixed with 50ml orange juice.  We covered the cake, and then when the icing dried, it had a very nice glossy finish.


    Because the recipe was so simple, I tried it out making cupcakes!  I frosted with melted chocolates...

    ...and the left over orange icing!  I added the Cointreau for these cuppies and my kids really loved it!

    The texture is so fine and fluffy.  I didn't store them in the fridge, just in an air-tight container on the kitchen counter.

    For a larger cake, you might consider using a simple choc ganache, but jazzing it up with Cointreau:

    Ingredients:
    170g Dark Chocolate (I used the Cadbury Old Gold 70% Cocoa)
    1 teaspoon Cointreau
    1 can Nestle Cream Pure Dairy Sterlised Cream

    Method:
    1. Heat the choc in a microwave oven at short bursts of 20 sec at med heat until all the choc is melted. Be careful not to burn the choc.
    2. Pour the can of cream into the melted choc and mix well until the two ingredients are incorporated.
    3. Add in the Cointreau and blend well.

    Done!

    The choc ganache is pliable and holds itself well in our warm weather. Excess ganache can be stored in the fridge and warmed in the microwave before use.


    Tuesday 31 May 2011

    When Life Gives You Lemons

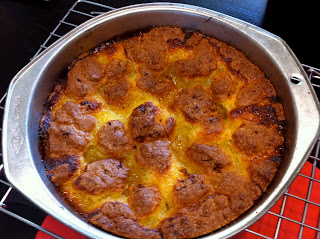
    A warm-hearted lady sent me a recipe yesterday, for a "Luscious Belgian Lemon Teacake".  The recipe was so simple and didn't involve the use of a mixer that immediately I was intrigued at how it would turn out.

    The method to this cake involves cooking a custard filling for the centre of the cake, which I suppose is what gives it its 'lusciousness'. ;)


    Ingredients for Cake
    1 cup self raising flour
    1/2 cup castor sugar
    60g butter
    1 egg, lightly beaten

    Method

    1. Line a 17-cm round cake tin. (I used my 8-in round cake tin, which is about 20-cm).
    2. Sift the flour and add the sugar.  Rub in the butter until breadcrumb-like, then add the egg.  You'll get a sticky dough.
    3. Divide the dough into 3 parts, and put 2 parts into the bottom of the tin, and spread it out with your fingers.

    Ingredients for Lemon Custard
    Zest of 1 lemon
    Juice of 1 lemon (about 1/4 cup)
    1/3 cup of sugar
    1 egg, lightly beaten
    60g butter

    Method

    1. Put all your ingredients except the lemon zest into a saucepan and melt on low heat, stirring constantly.
    2. Once the sugar has melted, slowly bring the mix to boil and it will thicken.  Once that happens, turn off the heat.

    Back to Cake Method

    1. Sprinkle half of the lemon zest over the cake batter in the tin.
    2. Pour the lemon custard over the cake batter.
    3. Cut up the remaining cake batter into teaspoon sizes and drop them onto the custard to cover evenly.

    4. Sprinkle the rest of the lemon zest over the cake and pop it into the oven set at 180 deg C for 30 mins. (I lowered the heat after 15 minutes to 175 dec C because the top of the cake looked very brown. :))
    5. Cool in the tin.
    6. Remove from tin, sprinkle icing sugar on top, and then serve with tea.  Yums!


    The fragrance of this cake while baking is wow!  The whole house is filled with its scent. :)
    The cake is crumbly, sticky and parts of it crunchy... what a mouthful of texture and goodness!

    So friends,
    When life gives you lemons, don't despair!
    Make this luscious lemon cake to share -
    Your woes are halved, your blessings doubled,
    When friends share your lemons and your trouble.