Thursday 27 October 2011

Air-fried Chicken Chop


I bought a Philips Air Fryer about 2 weeks ago, and was inspired to try modifying a baked crispy chicken recipe.

The initial recipe can be found here, but I felt that the baking time of 60min is too long for boneless chicken parts.  Anyway, the idea of using mayonnaise as a coating base appealed to me - it sounds perfect as a coating base for the Air Fryer.

The Air Fryer works like a mini-oven, but with a better air-circulation, thus ensuring that food is cooked on all sides evenly.  Unlike oven baking, where one side is usually heated more than the other, and there is a need to flip the food, the Air Fryer eliminates this need.

Anyway, this is my easy version of Air-fried Chicken Chop:

Ingredients
Filet of Chicken
Herb, Spices & Salt for marinate
Mayonnaise (I used my homemade mayo)
Crushed Cream Crackers mixed with pulverised Oats (but you could use Breadcrumbs or panko)

Method

1. Use a meat hammer to flatten the chicken.  Doing so not only ensures that the meat has an even thickness so cooking is even, but it also tenderises the meat.  Then, marinate the chicken with your favourite blend of herbs and spices and salt.  Try to keep it a dry marinate.  For this particular version, I used dried oregano, basil, paprika and pepper.  You don't have to marinate it long - about 10 minutes will do.  However, if you want to marinate it longer, it's up to you. ;)

2. Because it was a dry marinate, dipping it into a mayo undercoat ensures that the chicken is evenly coated.  After the mayo dip, dip the chicken into the Cracker mix.


3. Put the meat into the Air Fryer basket, and fry the chicken for 10 minutes at 180degC.

And that's it... crispy coated chicken, with a moist, tender texture.  Yummy, simple and if you're using homemade mayo, heart-healthy oils. ;)


Edna's Chicken Chop with Mashed Potato
Adult version

This is the full meal - mashed potato with herb butter, and Fresh Tomato Soup.
The chicken chop can be made smaller like nuggets, or served as a main course, or even between bread or in a bun like a chicken burger. ;)

Sunday 23 October 2011

Heart-healthy Roasted Garlic Herb Butter


This is so easy to do and the end result is so delicious and its impact on your plate and palate is so WOW!

Ingredients:
1 bulb roasted garlic (Don't peel the garlic.  Just remove as much of the outer skin as possible and put the entire bulb in a toaster oven for about 10 minutes.  Once the garlic is done, let it cool, and then squeeze the individual garlic out of its pod.  Trust me, it's less messy this way. ;) )
1/3 cup olive oil
1 block butter soften to room temperature
Any favourite herbs, fresh or dried (I have a pot of rosemary plant, and I used one stalk for this, along with dried oregano, basil, paprika and pepper)
Salt to taste

Method:
  1. Blend the roasted garlic with the olive oil and other herbs.
  2. Put the butter in to blend well.
  3. Done!
The butter mix is now very soft because of the addition of the olive oil.  This is actually good because it means that spreading the butter on bread for garlic bread would be very much easier.  Also, if used by itself to accompany potatoes or meat, the butter would melt to the food faster.  However, it doesn't look too appetitising to put a dollop of the butter mix on food, does it?  So, take it a step further, and whip out your pretty IKEA ice-trays...


I find it a challenge to scoop the butter into the trays and get it into the crevices, so I use my piping tube to help me out:


Then I pop the ice tray into the freezer overnight and then to save freezer space, I take out the frozen cubes and arrange them in an air-tight freezer container, separating each layer of butter with plastic wrap:


Aren't they pretty?  And since they're made in advance, all I need to do is to just arrange them on a plate to serve with warm rolls, or on top of a hot juicy steak or a nice fillet of fish. ;)

Don't forget to keep them in the freezer so that they maintain their lovely shapes. :)

Almond Biscotti

I just bought a Dolce Gusto to make lovely lovely Cappucino at home.  And what better to accompany that perfect cup of coffee than a slice of crisp, almond biscotti?


I had this recipe for ages - ripped off a Popular Bookshop Magazine, POPclub, years ago, but never had the impetus to actually make the biscotti until today. :)

I'm retyping the entire recipe here, and will comment on it after:

Ingredients:
120g Plain flour (sifted)
a pince of salt
3 egg whites
100g caster sugar
1tsp vanilla essence
180g unblanched almonds

Method:

  1. Beat egg whites with salt until form.  Gradually add in castor sugar and vanilla essence.  Beat until it thickens.
  2. Add in flour and almonds.
  3. Spread mixture into a well-greased 18cm by 18cm square tin.
  4. Bake for 20 to 25 min at 170degC until light brown.
  5. Remove and place it on a wire rack to cool.
  6. Wrap dough with foil and keep for 2 days under room temperature.
  7. Cut the dough into thin layers, and place a single layer onto a baking tray.
  8. Bake in oven 160degC for 12 to 15 minutes or until it is dry and crispy.
Comments:
I didn't have 3 egg whites - only two because I used the yolk for baking 2 pies.  Therefore, I reduced all the ingredients proportionally.  Also, I didn't have a 18cm by 18 cm square tin, and so I used a 16cm circle tin, which I sprayed with oil.

After baking and cooling, I wrapped the cake/bread in an aluminium foil, and put it into a non-airtight plastic box because I was concerned about ants. ;)  After 2 days, I sliced into thin (but I think I could slice it even thinner if I had a sharper knife... too lazy then to sharpen it. ;P) slices and pop it into the oven.  It took longer than 15 minutes to get crispy, but the texture is nice - not very sweet - and perfect to pair with a hot cup of aromatic coffee. :)

Saturday 1 October 2011

Ice... Cream Cake?

It being Children's Day, it would be the perfect time for cupcakes and ice-cream... only in this heat, how could an ice-cream retain its shape?  Ah-ha!  The perfect solution then: an "Ice" Cream Cupcake! ;)


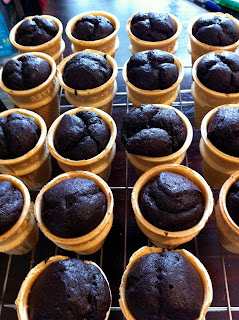
This is really an easy and fun project for the kids to do too.  I started out with a flat bottom ice-cream cone wafer.  Flat bottom, because I wanted to end up with a cake that looked like McDonald's Vanilla Cone, and also because it would be less of a hassle to bake.

I used my favourite chocolate cupcake recipe and poured it into the cups.  I used the muffin tray to help hold the cones evenly separated.  With the recipe, I was able to make 18 cones.


Next, I made a perfect buttercream for this weather: Swiss Meringue Buttercream.

I discovered this recipe while looking for a better buttercream recipe, and this was the result.  Swiss Meringue, because of the way it cooks the egg whites, creates a buttercream that holds well in our hot and humid weather, and yet has a silky, creamy texture - much like a soft, creamy marshmallow. *dreamy sigh*


Instead of posting up the how-to, here's a video of how simple it is to make:


Although the ratio for the eggwhite:sugar:butter is 1:2:3, I actually used 70g egg white (from 2 eggs), 125g sugar and 200g butter.

After the cake was cooled, I covered the top with the cream and then piped the soft-swirl look on the cones...

And ta-da!

Happy Children's Day, young and young-at-heart! =)

ETA (2 March 2012):
I made this again, on my Girl's request that I make it for her Birthday.

Instead of using the SMBC, I just used a plain meringue frosting.  The frosting held up better and was much easier to pipe.  I used about 1:1 amount of eggwhite to sugar, and added vanilla for the white cones and added strawberry emluco for the pink ones. :)

The Meringue frosting kept better and was better received by the kids.  It tasted like marshmallow. ;)
I used these baskets, and sewed fishing lines across to hold the cones apart.  It also stabilised the cones so that I could carry it to school.
I used another basket to cover the bottom basket, and taped the sides to secure.  The blue baskets were later used to elevate the cones for display.

Happy 6th Birthday, Beautiful Girl! :)
I used 6 'Happy Birthday' tags to jazz up the cakes.  With cones, displaying them is a bit difficult.  I had a '6' candle that's at the table, which you can't see in this pic.  The pink and purple cloth are recycled from last year's display, and they are hiding the blue baskets. ;)