Sunday, 8 August 2010

Sambal Belacan


When I was growing up, there were times there may be up to 3 different types of sambals on the table; each as a condiment for a different dish my Granny cooked. That was how seriously she felt about taste, and how serious accompaning sambals were to a Peranakan table.

One of the most versatile sambals on our Peranakan table would undoubtably be the Sambal Belacan. A good Sambal Belacan is all about the belacan. And there are many different types of belacan on the market, of varying quality, shapes and sizes.

When I was younger, before belacan was vacuumed-packed in pretty packages, Ah Mah used a belacan that came in a rectangle shape. So the usual measurement of 'about an inch' or 'about half and inch' made perfect sense - especially coupled with Ah Mah's cooking method of 'agak'-ation (estimation). Later on though, with belacans coming in circle shapes, differing rectangular blocks, well, it wasn't enough to give measurements by length. ;P

Anyway, Granny only uses this brand of belacan:

Brand loyalty on my part? Maybe. But I really find that the taste of this belacan is really good, compared to others that I've tried, because this brand is really, really hard to find in Singapore. My brother buys a few packets of this each time he goes to Malaysia for Ah Mah, and she hoards it like gold! =)

I finally found a stall in Holland Village market that sells this brand of belacan, so knowing that I have a steady supplier in Singapore, I only buy 2 packs each time either hubby or I am in the area. =)

Sambal belacan is one of those things that generally tastes the same, but is different depending on the person making it, precisely because of the quality and quantity of belacan used. There is really no 'standard' taste, but only 2 ingredients take centrestage to make the sambal what it is.

My sambal belacan is extremely spicy. But it's the way I like it. When I made the sambal belacan for my granny though, I used more big chilis which are milder, compared to the fiery hot chili padi, or birds' eye chili.

Ingredients:

400g Big chilis
200g Chili padis
70g Belacan
Sugar to taste
Salt to taste

Method:
  1. Deseed all the chilis. I usually have to put on 2 plastic gloves, one over another, to do this. Trust me, it's an extremely hazardous thing to deseed chilis, which is why whenever I make my sambal belacan, I make a huge batch so that I don't have to revisit this 'torture' anytime soo. ;P Like I said, my sambal belacan is extremely hot, and you should tweak the chili proportions to your threshold of pain tastebuds. Keep the weight about the same, but use a whole lot more big chilis to the chili padi.
  2. Toast the belacan either in a toaster oven or pan-fry it dry. It's important to do so because it will heighten the flavour of the belacan.
  3. Because of the quantity I make, I use a food processor to blitz my chilis, making sure not to blitz it too finely, nor too coarse. The texture I aim for is for it to resemble pounded chili.
  4. Blitz the chilis with the belacan.
  5. Add salt and sugar to taste. Keep the sambal belacan in a clean glass jar in the fridge if used regularly, or in the freezer if not going to be used soon. I usually make 2 jars - one to be frozen to be used after the jar in the fridge is used up.
  6. Use a clean teaspoon to scoop about 2 teaspoons out from the jar. Serve the belacan with lime juice from a small lime (aka Sng Kum).

See? Even the bottle says it's hot. ;P

Ayam Goreng Kunyit


We just whipped this up in a hurry for dinner tonight. We had defrosted about 12 pieces of chicken drummets and mid-wings to make Chicken in Chinese Wine, but as we decided instead to buy fried rice for dinner, I decided that fried chicken would go better with it.

I had kunyit powder or tumeric powder on hand since the last time I made Ayam Lemak (another post for another day. ;P), so we used it as a simple marinate for this dish.

Ingredients:

1/2 tbsp Kunyit Powder (aka Tumeric powder)
12 pieces Chicken Drummets/Mid-wings
2 tsp cooking oil + cooking oil for frying
Salt to taste

Method:
  1. Dry the chicken pieces with a kitchen paper towel. This will help the kunyit adhere to them.
  2. Using a glove - kunyit leaves a stubborn yellow stain - marinate and coat the chicken with the kunyit powder, 2 tsp of cooking oil and salt. We were in a hurry, so we only marinated for about 10 minutes. If you could, marinate as longer. Nonetheless, the 10 minutes marinate still tastes so good. =)
  3. Heat oil up and fry the chicken pieces until done. Keep to medium heat and fry about 8-10 minutes each batch. Drain well to leave behind a crispy, yummy Ayam Goreng.
And it will be a long time when we next buy Ayam Goreng from any Nasi Padang stall. ;P

Saturday, 7 August 2010

Sambal Tumis


This post is specially dedicated to my friend Maggie, who wants to know how to make my Sambal Tumis. =)

Sambal Tumis is the flavour of my growing up. My granny would fry fish and then fry this sambal to lovingly slather over the fish. My Peranakan granny would make this sambal enough for the fish and have me help her prepare the ingredients by peeling the shallots, garlic and deseed the chilis.

Sadly, it is only after she passed away this year, that I rediscovered and was able to recreat this most versatile and delicious sambal. I found a simple recipe online, and with "agak"-ation (that most typical way of cooking my granny does, by estimation ;P), I've managed to tweak it to that taste that never fails to remind me of Ah Mah.

Furthermore, the website I found the recipe also suggests making the sambal in a larger batch, so that unlike Ah Mah's way of frying the sambal only when needed, all I need to do is to scoop a tablespoon or so out and add it to whatever I have on hand to make a dish - hard-boiled eggs, fishball, prawns, squid and yes, fried fish. =) The sambal is a good intro for young kids to eating spices because despite its fierce RED, the spiciness is actually very mild. The kick to the sambal is actually the blend of the garlic and onions, giving it a lovely pungent flavour to the whole. Part of the redness is from the dried chili - which explains the mildness of the spice. Fresh chilis would have made for a more fiery sambal.

Therefore, the recipe I'm posting here makes about 600+ gram or 2 jam jars of the sambal. I usually freeze one jam jar and they do keep very well because of the oil and spices in the sambal.

Ingredients:
To be pounded or processed into a paste:


100g Dried Chili (After measuring it out, deseed the chili, and soak for at least half an hour. Then drain. You can replace this with fresh chili for a spicier sambal, but the dried chili version keeps better than the fresh chili version.)
400g Shallots (or a shallot/Red onion mix or just red onions)
35g Garlic
9 pieces Candlenut (aka Buah Keras. Or if Candlenuts aren't available, substitute it with Macadamia nuts)
45g Belachan (toasted either in a toaster oven or pan-fry it dry; doing so will heighten its flavour.)

Because of the amount of spices involved, it would take a lot of energy to "tumbok" it in a pestle and mortar. Therefore I use a food processor to blitz my spices. However, to make sure that my spices are blended into a texture like pounding, I process my spices individually and then mix them in a bowl. However, if your food processor is larger, you may blend your spices together, and to help faciliate the blending, just add a little water or oil.


Also, the amount is an estimate. If you prefer a sweeter version of this, add more onions. More pungent? Add more garlic. Spicier? Then go with fresh chilis - or better yet, throw in a few chili padis! More lemak? More nuts. ;P

To be prepared ahead and added while frying:

60ml Assam water (or about 4 tsp Assam/Tamarind pulp mixed with 60 ml of water and strained.)
2.5 tbsp Sugar (or more if you like the paste sweeter)
1/2 tsp Salt (to taste - and depending on the brand of your belachan.)

Method:
  1. Heat up 1/2 cup of heart-healthy oil in a wok. (I use Canola oil. =)) Test the readiness of the oil with a small bit of the paste. When you see the small amount of paste sizzle, add in all the paste into the wok and set the timer for 10 minutes. Keep stirring the paste on and off for this duration at low to medium heat. There won't seem like much going on, just a bit of steaming, but this initial blending of the spices is to prepare it for the second step.

  2. The chair is there to facilitate the long process of frying the sambal. ;P See the amount of oil bubbling in the wok below:
  3. At the 10 minute mark, add the Assam water, sugar and salt. After adding the condiments, you could taste test and add more sugar or salt where needed. Continue frying about 15 to 20 minutes more at low heat.
  4. You'll notice that the paste appears to absorb all the oil, and there isn't a lot of bubbling, just a lot of evaporation:
  5. Towards the end of the frying time, you'll notice that some of the oil starts to separate from the paste, and there's a lot of steam produced. This is a good sign that your sambal is heading for completion. =)
  6. The sambal also looks dryer and stickier:
  7. Once the time is up, and you see that your sambal has turned a darker shade of red, remove it from the wok into a clean and dry bowl to cool. Once it is cooled, store it in clean glass jar in the fridge.

To use:
Be as creative as you like:
  1. To oil in a pan or wok, add about 1 to 2 tablespoonful (or more) of the sambal to warm it up and make it more pliable after its stint in the fridge.
  2. Add in other ingredient of choice. eg.
  • Hard boiled Eggs or Quail's Eggs
  • Ikan Bilis (Fry the ikan bilis first, then add the sambal into the pan)
  • Fish ball (Fry the fish balls first)
  • Prawns or Squid or other seafood (Fry the seafood a little first, then add in the sambal)
  • Fried fish (Fry the fish and plate it first, then fry the sambal and pour it over the fish)
Or use the sambal as a dipping sauce for Nasi Lemak, or eat it with keropok. Or like Ethan did - he added it to his Macaroni & Cheese! lol!

I love it added to my dry instant noodles - those instant noodles I buy without the soup condiments. It's lovely mixed in the noodles, with a sunny-side up egg on top. =)

It's also good on its own.

Monday, 3 May 2010

Chinese Apple Soup


Edna has been suffering from coughs for the past 5 days, and the poor dear has been miserable through the night, waking up to cough. Therefore, I was happy to find this Chinese Apple soup recipe, because apparently the soup is cooling and good for dealing with phlegms.

I found this recipe here, but I've modified it with another Apple soup recipe I found online sometime ago.

Ingredients:
2 large Fuji apples (remove core, then cut into 8 pieces each)
1 onion, cut into quarters
200g soft pork bones
10g sweet almonds (南杏)
5g bitter almonds(北杏)
8 dried dates, with seeds removed
3 fig fruits (无花果)
1.5L water
Salt (to taste, but optional)

Method:
1. Blanch the pork bones over boiling water and set it.
2. Rinse the dates, figs and sweet and bitter almonds and set them aside.
3. Put water (I usually boil my water in an electric kettle to save using the gas) in a thermal cooking pot, with all the ingredients listed. Bring the water to boil for about 10 minutes.
4. Put the thermal pot into the outer pot and keep it there for at least 2 hours.
5. Add salt to taste. Serve.


The soup is refreshing to taste. Light and sweet with a sourish, salty tinge. I haven't tried this, but apparently you could half the number of apples and replace it with Chinese Pears (those yellow ones), or even replace the apples with pears if the pears are in season.

What makes this soup good for cough is the following:
(Source: The World of Nourishing and Fine Soups by Kenny Chen)
  • Sweet almonds (南杏) : It tastes sweet and is neutral in nature. It is non-toxic and relieves cough.
  • Bitter almonds (北杏): It carries a slight trace of toxins but heals cough and expels phlegm.
  • Fig fruits (无花果): It clears heat and phlegm, nourishes the lungs and aids digestion with its high fibre content.
I wrote the Chinese names down and went to the nearby Chinese Medicine shop and bought 50g of each of the above. It came to S$3 only. There was enough ingredients to make another batch of this soup, for the amount of figs; but there was still so much of the almonds for a few batches. =)

The next time I make my Chinese Watercress Soup, I'll add the almonds - especially if my little ones have the coughs. =)

Monday, 26 April 2010

Cream of Pumpkin Soup

I just made Cream of Pumpkin soup today. It was so good that Edna had second helpings and was ready to call one of our friends to tell her how yummy it was! lol!

I'll put up the photos once I've downloaded them. =)

Cream of Pumpkin Soup:
Ingredients:
At least 1/2 a medium pumpkin
1.75 litres water

60g Celery (finely sliced)
3 cloves Garlic (chopped)
1 large Onion (chopped)
1 potato, 1cm cubed
30g butter
40g flour
2 Knorr chicken cubes

1 tablespoon rolled oats
200ml UHT milk
1 tbsp sugar
Pepper to taste

Method:
1. Boil 1.75 L of water.

2. Clean out the pulp of 1/2 a pumpkin, reserve the seeds to toast for a snack. No need to remove the pumpkin skin, but cut the pumpkin to about 1 inch pieces and toast them in the oven for about 20-30 minutes until the pumpkin is soft. Toasting the pumpkin caramelises the sugar in the pumpkin for a lovely sweetness. =)

3. Once the pumpkin is soft, the skin can be removed easily. Put the pumpkin into a food processor or blender, but don't start blending yet!

4. In a frying pan, melt the butter and fry the onion, garlic, potato and celery until soft. To this mix, reduce heat slightly and add the chicken cubes and flour and stir thoroughly for about 1 or 2 minutes. Add some of the hot water until you get a thickened watery mixture. Add in the oats, but you don't need to cook it further.

5. Put this thickened mixture into the food processor or blender, and blend it with the pumpkin. If needed, you can add more hot water.

6. Pour the blended mix back into the soup pot, add in the rest of the hot water, milk and sugar, then turn up the heat.

7. When the soup is boiling, put it back into the thermal pot for a time to let the flavours mix. You do not have to reheat the soup before serving.

8. Freeze or refrigerate whatever soup not consumed.

Yes, the soup base is like that of my Broccoli Soup, so if you're familiar with that easy to make soup, this is just as simple to make, healthy and so good to eat. =)

Friday, 9 April 2010

Oh Wow Oh My Caramel Popcorn


Basic Popcorn is so easy to make and is such a fantastic low-calorie snack. Unlike the popcorn you buy at cinemas, you get the option of how much butter and salt to add. However, there's nothing... absolutely nothing like crispy, caramel-coated bites of calorie-laden popcorn to tantalise those tastebuds.

To make popcorns, it's a simple 2 ingredient method:
In a medium saucepan with lid, pour in about 1 tablespoon of oil (I use Canola) and about 3 tablespoons of corn kernels. You can buy these corn kernels from the dry goods section of NTUC or most supermarkets.

Close the lid on the saucepan, and put the pot on medium heat. Shake the saucepan gently to coat the kernels with the oil, until you hear or see (if you're using a glass lid) the sound of a popcorn popping. Continue shaking the pot until the popping sound slows down to about 2 seconds between each pop. Remove the popped corns into a fresh bowl and if there are still unpopped kernels, you can return those to the heat.

If you like, you can melt some butter and salt and drizzle the mixture over the popcorn. Otherwise, you could try this easy "Oh Wow Oh My" Caramel Popcorn.

For 100g of freshly popped popcorn,

Ingredients
50 g salted butter
200 g brown sugar
55 ml corn syrup
1/2 tsp baking soda
1 tsp vanilla extract

Method
  1. Preheat oven to 95 degrees C. Place freshly popped popcorn in a very large bowl in the oven to keep warm.
  2. In a medium saucepan over medium heat, melt butter. Stir in brown sugar, corn syrup and salt. Bring to a boil, stirring constantly. Once sugar has melted, boil without stirring for 4 minutes. This will make the caramel crispy later.
  3. Remove from heat and stir in soda and vanilla. Pour in a thin stream over popcorn in the bowl and stir well to coat.
  4. Place in a large shallow baking sheet and bake in the preheated oven, stirring every 5 minutes, for about a minimum of 15 min. The original recipe calls for stirring every 15 minutes for an hour, but I was in a hurry and the kids were impatient for the treat. ;P
  5. Remove from oven and let cool completely before breaking into pieces. This is very important, otherwise the popcorns will be too hot and sticky. Waiting until it cools makes the treat less sticky.
That's all for now... enjoy the treat! =)


Sunday, 4 April 2010

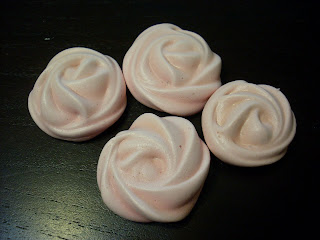
Rose Meringue Cookies


These cookies are so simple to make and they taste so sweet and light.

Ingredients:
90g Egg White
175g Caster Sugar
1/2 tsp Cream of Tartar
1 tsp Rose Essence
2-3 drops red food colouring

Method:
1. Beat egg white in mixer until frothy, then add in the cream of tartar.
2. Beat the egg white until soft peak appear, then add in the sugar tablespoon by tablespoon so that it mixes in and dissolves. You'll want your egg white to look stiff and glossy.
3. Add in the essence and colouring.
4. Pipe the egg white onto a lined baking sheet in swirls to look like rosettes.
5. Bake in a pre-heated oven at 120 deg celsius for about 60 minutes, turn off the oven and leave it in there for another 60 minutes.

Store in an air-tight container.

You could make variations of these meringue cookies, limited by your store of essences and imagination. Instead of rose essences, you could use lemon or lemon essence for a lemony meringue cookie. Just remember that it's a sweet treat, so your essences need to have a citrusy base or a fruity base to work. ;)