Saturday, 23 April 2011

Kiwi & Strawberry Meringue Nests


Meringue Nests are so simple and easy to make, and such a delight to eat.

The fruit possibilities are endless, and this dessert is so simple to make and refrigerate before guests arrive.

Swiss Meringue
Ingredients:
90g Egg White, room temperature
175g Sugar
1/2 tsp Cream of Tartar
1 tsp Vanilla Extract

Method:

  1. Boil a pot of water and keep it at just below boiling heat.
  2. Put a metal bowl on the water in the pot.  Put in all the ingredients and beat the mixture using an electric beater on low until all the sugar dissolves.  This will take about 3 minutes.
  3. Remove the metal bowl with the mixture from the pot, add the vanilla extract, and then continue to beat the egg whites on high speed for another 10 minutes.  You'll need to get to a point where the egg whites are glossy white and stiff.
  4. Transfer the egg white into a piping bag.  On a baking parchment's reverse side, use a tea-cup to draw round circles with a pencil.  Carefully pipe a base starting from the centre of the circle outwards.
  5. Complete all the circles, and then pipe the sides up to make a container or nest.

  1. Bake in a pre-heated oven at 100 deg C for 75 minutes, and leave it in the oven for another hour.
  2. Store in an air-tight ziplock bag until needed.
I had initally used my previous meringue cookie recipe, but I was intrigued by the Swiss Meringue method of heating the egg white and sugar to achieve a smoother and lighter meringue, which indeed makes a slight difference to the texture.  That said, the French method of just beating the egg whites and sugar without heating it up is simpler, and the crunchier texture will contrasts well with the whipped cream too.  I suppose the choice of methods is really up to you. :)

Anyway, to assemble the Meringue Nest is as simple as whipping up some whipped cream with a little sugar to taste and spooning a tablespoon or two into the nests, cutting up some seasonal fruits (or fruits on offer at the supermarket ;) ) and arranging it prettily in the nests, and refrigerating them until dessert time.

The effect of this dessert when presented is almost always a look of surprise and lit-up eyes.  It's really worth the look of joy on their faces when it's really a simple dessert to assemble.

A word of warning though - this dessert cannot be kept overnight.  The meringue nest will soften.  Therefore, make the meringue last - just before your guests arrive - to put into the fridge.  That way, the meringue will remain crisp. :)


8 Oct 2011, Edited to add:
Since the time I made this meringue, I've purchased a Kitchenaid (KA).  Naturally, I wasn't able to use a hand-held mixer to beat the egg white over the hot water.

Therefore, what I did is to do a modification based on the Swiss Meringue Buttercream.

To my 2 egg whites (about 70g), I used almost double that amount for sugar (about 138g), 1/4 teaspoons of Cream of Tartar and 1 teaspoon of vanilla extract, and all these I put into the KA bowl, and heat it up over boiling water, all the while stirring it with a whisk.  I did this until the sugar dissolved into the mix, and then put it on the KA to beat on low speed for about a minute, then on high speed for about 6 to 8; when it more than doubled its volume.

I made smaller nests this round, because the initial eggwhite amount is smaller (70g, compared to previously 90g).  But again, the meringue nests are really a very simple and easy dessert to make. ;)

14 Feb 2012, Edited to add:


I've tinted the meringue with a little red gel food colouring to get pink nests for a Valentine's Day dessert.

Also, because of time, I've made a larger pie-like nest instead of individual nests for the adults at the dinner to share.  The kids got mini ones all to themselves.  I piped the words with Nutella. ;)

Wednesday, 13 April 2011

My Little Helper

Who needs soap-and-water when you've got a little volunteer to lick up your beaters? ;)

Wednesday, 23 March 2011

"Instant" Cream of Mushroom Soup


NTUC had a sale on sliced button mushroom... S$2.10 per pack of 200g. And with Edna bugging me to make "her favourite mushroom soup", it was a good opportunity to make the soup.

INGREDIENTS:
400g Fresh button mushroom, chopped, but reserve about 50g and set aside.
1 tablespoon Butter
1 tablespoon Flour
1 large Onion, chopped
2 stalks Celery, chopped
2 cloves Garlic, chopped
2 cups Fresh Milk
1L Water
1 Chicken Cube (or Vegetable cube if vegetarian)
Salt and Pepper to taste

METHOD:
1. Heat up butter in a pot, and add flour to it when melted. Stir it until you get a yellow ball, then add in the onion, celery and garlic and fry for about 2 minutes.
2. Add in the milk and stir to thicken, then add in the mushroom and let it simmer for a minute.
3. Add in half the water and wait for mushroom to soften - about two minutes.
4. Remove the entire soup and put it into a blender. Or if you have a hand-held blender, that works well too.
5. Return the blended soup into the pot and add in the rest of the water to dilute it to your preference. Add in the reserved chopped mushroom to give the soup more texture.
6. Add salt and pepper to taste.
7. Serve with grated cheese as garnish.

If you make it in a thermal pot, you can put the completed soup into the outer pot until needed.

The soup's so fast and easy to make that we don't buy instant soup anymore. ;)

Slurrrrrp!

"My favourite soup! It's already my second bowl of soup!"


Saturday, 19 March 2011

Steak and Guinness Pie


I didn't know that 17 March was St Patrick's Day, when I decided to make this pie. St Patrick, of course, is the Patron Saint of Ireland, land of Guiness Stout, a main feature of this pie.


Before starting out, I googled a few Steak/Beef pie recipes, but in the end, I settled for Jamie Oliver's version, from his book "Happy Days with the Naked Chef".

Not all the ingredients are easily available here, though, so I made do with some substitutions. Also, this amount is almost double the recipe because whenever I make pie, I usually make enough to keep for another meal within the week. The time going into pie-making must be worth it, don't you think so? ;P

INGREDIENTS:
1kg Beef steak (I bought 2 x 500g of frozen beef cubes from NTUC, and then I sliced each cube into half)
Salt and freshly ground black pepper
Flour enough to coat beef
Olive oil for frying
3 medium Onions, peeled and roughly chopped
2 medium Carrots, peeled and cut into 1/2 inch-pieces
7 sticks Celery, washed and cut into 1/2 inch-pieces
1 sweet potato, peeled and cut into 1/2 inch-pieces
Liberal dashes of dried oregano, thyme and 3 pieces of bay leaves
1L Guiness Stout (I bought 2 x 500ml can)
5 very large tomatoes, skin removed and cut into 8 pieces each (Click here to learn a painless way to skin tomatoes)
1 tsp tomato paste

METHOD:
Because the stewing process took at least 2 hours, I used an induction cooker. I didn't want to use the thermal pot for this stew because the thermal pot won't be able to reduce the stout into the thick gravy I needed.

1. Season the beef pieces with salt and ground black pepper. Sprinkle in the flour and toss until coated. Heat olive oil in the pot and fry meat in batches. The meat need not be cooked through, but the surface has to be sealed in. This will ensure that the meat will be juicy and tender during the stewing process.

2. After the last batch of meat is done, return all the meat back into pot and add the onion. After one minute of stir-frying, add the carrots, sweet potatos, celery and liberally add in the herbs. Fry for a further 4 minutes and then add Guinness and tomatoes. Bring to a boil, then simmer uncovered for 2.5 hours or until meat is really tender, and the sauce is thick. Add salt and pepper if needed at this point.


3. Jaime Oliver advise that at this point, the stew could be served as a stew with mash potato, or to leave it for 5 days in the fridge to improve its flavour. For me, I needed the stew cooled to put it into my pie. =)

4. I used my Yogurt Pie Crust recipe (doubling the amount) for making the pie crust, but it's mostly because it's not easy to get premade pie crust; use premade if you are able to find, and flaky pie crust ones are best. I did consider using frozen prata for the cover, but at the time, I had made more than enough crust, so I didn't need to do so... perhaps I'll half the amount the next time I make it and use the flaky prata dough for the cover. =)

5. Brush a beaten egg over the pie and poke a few holes in the pie crust for vents. Bake the pie in the oven at 180 deg C, for about 30 minutes.
The pie! Oh the pie is flavourful - mildly bitter from the stout, but the taste is intense. The pastry helps provide that delicious mouth-feel of crumbly butteriness with the chewiness of biting into tender steak. Because the beef isn't cut too small, you'll literally get to chew on steak. Yum!

Friday, 18 March 2011

Dinosaur Cakepops

A mini-dino conference!


This is so easy to do! My dinosaur-loving nephew had a party and I made these for him.

Just fashion the cake into a dinosaur shape with a big head and a long tail. Use a skewer to shape arms and legs. Dip the shape into chocolate coating and attach white sprinkles for the eyes. Dot the sprinkle with an edible ink pen.

While the chocolate is still soft, attach jumbo heart sprinkles all the way down the back of the dino. If the choc is already hardened, then dip the heart into a little of the melted choc and attach it to the dino.

I made only 4 Dino cakepops for him, and he was so nice to share it with his cousins. =)


Headless dino!

The Hello Kitty Post (Part 2)

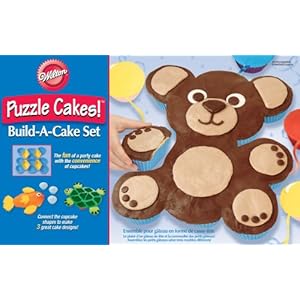
Continuing the theme of Hello Kitty cakes, I had intended to bake and decorate a Hello Kitty cake for the girl's birthday party. Then I stumbled upon this:
The minute I saw this cake set, I realised how simple making the Hello Kitty cake could be. From Edna's party last year, I realised that cutting the cake was usually a messy event. Making cupcakes would be far easier, but the effect isn't as nice as a large whole cake.

Therefore, the puzzle cake set was a perfect in-between - I had a big cake, and it's made up of cupcakes!
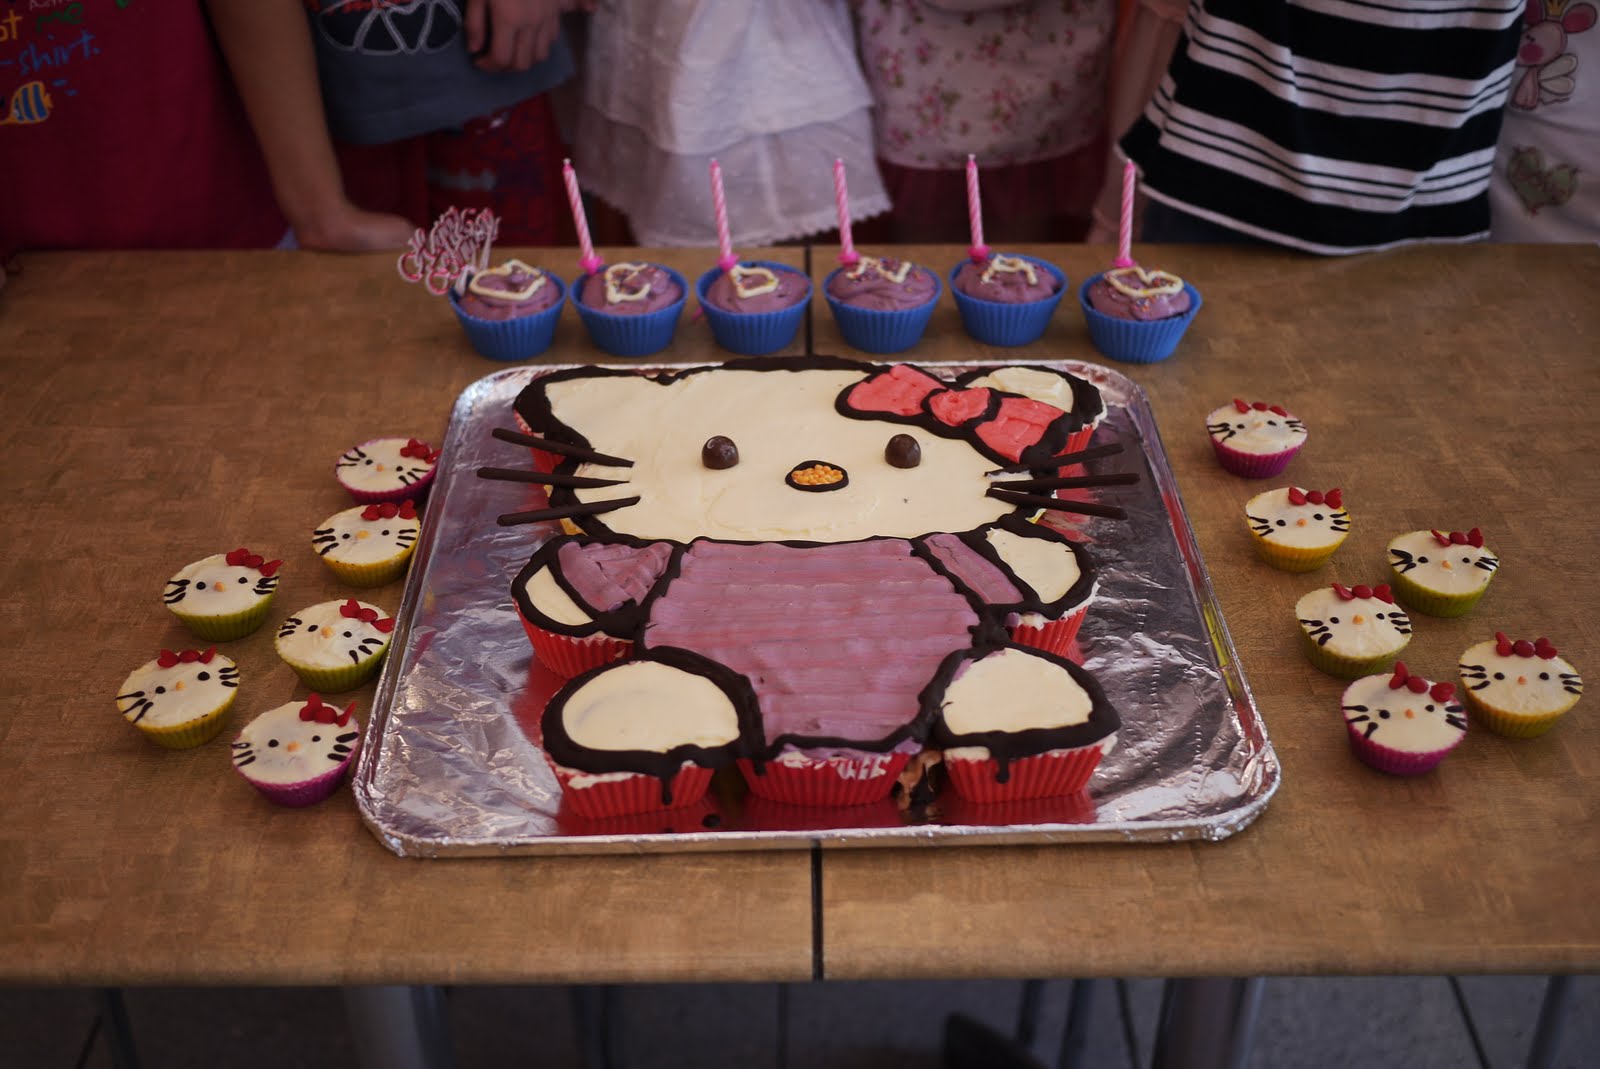
All singing "Meow"!

After baking the cake, I levelled the cups and arranged it like this:

I used my cookie sheet and wrapped it in foil as a base. After arranging, I filled in the spaces with frosting:
Then I frosted over the entire cake with white frosting:
After frosting over, I sketched out the pattern of how I'd be frosting the cake. Essential items of Hello Kitty would be the ribbon on her left ear. Also, the cake shape for the ear is curved, but I shaped it into a point. I figured that I'd deal with it when I outlined the cake later.
After frosting the cake, I used 2 chocolate Malteses for Kitty's eyes and yellow Nerd sweets for Kitty's nose. The cake was beginning to look like Kitty.
I outlined Kitty with the chocolate coating I used for Edna's cakepops. It was an inspired move because the chocolate hardened and helped hold the frosting together. I melted the choc in a HD plastic bag, cut a tiny hole at a corner and used it to pipe the outline. As there was already an impression in the frosting, the piping held neatly. I topped off Kitty's whiskers with Pocky sticks.

In case there wasn't enough cupcakes to go along, and in case of the usual "Could I have a smaller piece?" request, I also made mini cupcakes which I decorated like this:


I used the melted choc to pipe the whiskers and eyes. A Nerd sweet made up the nose. Two Jumbo hearts and a red M&M made the ribbon.

In all, we had 36 cupcakes - 12 mini ones and 24 normal size ones... more than enough for Edna's party. And on an environmental note, the cups can be reused because they are made from silicone. Therefore, before handing out the cups, we let our guests know that we were collecting the cups back, and they could help us by putting the cups into the cake box. =)

Cream Cheese Frosting Recipe:
2 boxes Cream Cheese
1 block unsalted butter
Icing sugar to taste (about 1.5 cups to 2 cups)
Flavouring of choice

Beat cream cheese and butter together. Gradually add icing sugar until frosting stiffens. Add flavouring of choice.

For this cake, I used a Strawberry essence, which went well with the chocolate cake.

The Hello Kitty Post (Part 1)


My daughter is a Hello Kitty fangirl, and she requested a Hello Kitty cake for her 5th birthday this year.

Last year, I made cupcakes for her preschool because I thought that it would be so much easier for the kids to each have a little cake to eat, rather than have the teachers cut the cake and deal with the mess that will inevitably result. Therefore, I thought I'd revive making Hello Kitty cupcakes, but I was inspired by Bakerella's Hello Kitty Cakepops to try that instead.

So what are cakepops? It's simply a word combination of cake+lollypop. Cake is crumbled and frosting is added as a binding to keep the cake together. It's then fashioned into a shape and put on a lollypop stick before dipping into a candy coating so that the cake is encased and the shape is retained.

Sounds simple, doesn't it? And you know what? It really is as simple as it sounds.

A few things to note though:

1. The cake to use ought to be one that's crumbly in nature. Dense and crumbly works better than light and fluffy cakes.

2. The cake pops works better if the room temperature is cool. Almost half of my Kitty pops melted by the time I got to my daughter's preschool. The good news is that I managed to salvage them by refrigerating the cakes; the bad news is that I wasn't able to do it at the school.

3. The candy coating that I used (Wilton) is thick. Thick isn't good for coating because its harder for the candy to drip off the cake. I learnt from a Phoon Huat staff to thin the candy with cocoa butter. I read that the candy coating could be thinned with shortening or even cooking oil, but I used cocoa butter.

4. Chocolate coating is the easiest coating to use because of its texture.

5. Freezing the pre-coated cakepops is an essential step. The frozen temperature helps the coating set more quickly, and the cake retains its shape better because of the frozen frosting in them.

6. The shorter lollypop sticks are more stable than the long ones. The cakes on the short ones are less likely to break apart.

Anyway, here are some of the pics from my attempt at my Hello Kitty Cakepops.

'Naked' Kitties. The choc chips helped shaped the ears after dipping.

Poor blind kitties... I was waiting for the candy coat to dry before drawing in the eyes.


Transporting them. You can see that they were already starting to melt in the sun. :(

The hardest part of making cakepops, I discovered, is in displaying them. I didn't want to go out to buy a styrofoam just for the cakepops, so I used an old disposable sushi tray and a soldering iron to put holes in them. I experimented with a holder of sorts under the tray, but I found in the end that it was much less hassle to just let the cake pops hang down the holes.

I used an upturned stand to allow the sticks to hang down, but display the cakepops well.

A closer look at the kitties. :)

Besides Kitties, I tried making other cake pops to vary it. Besides, I noted from my sons that the boys weren't likely to eat Kitty, so I made 'gender-neutral' cakepops like cupcake cakepops and lollypop cakepops. Heart-shaped cakepops were easy to make too.

Naked cupcakes. I used a skewer to make the indents on the base of the cake.
Completed cupcakes. These were sooooo much easier to make than the Kitties. lol!

The kids really enjoyed the cakepops, but I think it was partly the novelty of it all.
Chocolate coated heart

Lollypop studded with M&Ms... and a half-eaten cupcake

Fairy-sprinkled lolly

Heart and fairy-dust lolly, with a Kitty cakepop in the back.