Thursday, 23 June 2011

Orange Cake in a Blender


When I first saw this cake baked by a lovely lady, I was intrigued - a cake that was made in a blender!  Jam's photography made the cake look so drooling-good that I knew I had to try my hands at making this cake... and what an utterly quick and easy cake to make it turned out to be!  If you can measure out the ingredients, mix in the flour, and pop it into the oven, you're well on your way to savouring this cake! ;P


Orange Cake in a Blender
Ingredients:
1 large Orange (cut into quarters, and half it again.  Remove seeds and the white plith where possible.  No need to remove the skin - easy right?)
1 cup Sugar
1 cup Oil (I used Canola oil)
3 Eggs
2 cups all-purpose flour
1 tbsp baking powder

Method:

  1. Sift the flour and baking powder together.
  2. Using a blender, blend the orange, sugar, oil and eggs until smooth.
  3. Add the blended mixture to the flour, and mix them well together.
  4. Pour the mixture into greased pan.
  5. Bake in a preheated oven, 150 deg C for 40 minutes.


The cake has a very light orangey fragrance and is a perfect quick afternoon tea-cake.  It's absolutely beautiful with tea. :)

Absolutely yummy and did I mention how easy it is to bake? ;)


ETA:
I just melted some choc and poured over this cake... and the effect is oh WOW!  The choc just adds a whole different dimension to the fragrance of the orange cake... mmmm perfect!

ETA (14 June 2012):
I've tried another recipe of this cake, and it yielded a very good texture too.  It uses butter instead of oil, and self-raising flour instead of the plain flour+baking powder.  I used this recipe to help a friend bake a cake for her 12-month old daughter, so that the Birthday girl could cut and eat the cake with her family for her 1st Birthday. :)


Ingredients:
1 orange, chopped roughly into small pieces (cut into quarters, and half it again.  Remove seeds and the white plith where possible.  No need to remove the skin.)
1 1/2 cups self-raising flour
1 cup sugar
3 eggs
180g butter, melted
Icing sugar for dusting
**If baking for older kids, add about a teaspoon or two of Cointreau for a brighter fragrance)

Method:


  1. Preheat the oven to 180°C. Line a round cake tin with baking paper and set aside.
  2. Place the orange into the blender and blend until it's mushy.
  3. Add the flour, sugar, eggs and butter and blend until just combined.
  4. Pour into the baking tin and smooth surface. Bake for 40-45 minutes or until a skewer pushed into the centre comes out clean.
Made in a 9-inch springform pan.

Frosted with Orange Icing.  Basically,  250g icing sugar mixed with 50ml orange juice.  We covered the cake, and then when the icing dried, it had a very nice glossy finish.


Because the recipe was so simple, I tried it out making cupcakes!  I frosted with melted chocolates...

...and the left over orange icing!  I added the Cointreau for these cuppies and my kids really loved it!

The texture is so fine and fluffy.  I didn't store them in the fridge, just in an air-tight container on the kitchen counter.

For a larger cake, you might consider using a simple choc ganache, but jazzing it up with Cointreau:

Ingredients:
170g Dark Chocolate (I used the Cadbury Old Gold 70% Cocoa)
1 teaspoon Cointreau
1 can Nestle Cream Pure Dairy Sterlised Cream

Method:
1. Heat the choc in a microwave oven at short bursts of 20 sec at med heat until all the choc is melted. Be careful not to burn the choc.
2. Pour the can of cream into the melted choc and mix well until the two ingredients are incorporated.
3. Add in the Cointreau and blend well.

Done!

The choc ganache is pliable and holds itself well in our warm weather. Excess ganache can be stored in the fridge and warmed in the microwave before use.


Tuesday, 31 May 2011

When Life Gives You Lemons

A warm-hearted lady sent me a recipe yesterday, for a "Luscious Belgian Lemon Teacake".  The recipe was so simple and didn't involve the use of a mixer that immediately I was intrigued at how it would turn out.

The method to this cake involves cooking a custard filling for the centre of the cake, which I suppose is what gives it its 'lusciousness'. ;)


Ingredients for Cake
1 cup self raising flour
1/2 cup castor sugar
60g butter
1 egg, lightly beaten

Method

  1. Line a 17-cm round cake tin. (I used my 8-in round cake tin, which is about 20-cm).
  2. Sift the flour and add the sugar.  Rub in the butter until breadcrumb-like, then add the egg.  You'll get a sticky dough.
  3. Divide the dough into 3 parts, and put 2 parts into the bottom of the tin, and spread it out with your fingers.

Ingredients for Lemon Custard
Zest of 1 lemon
Juice of 1 lemon (about 1/4 cup)
1/3 cup of sugar
1 egg, lightly beaten
60g butter

Method

  1. Put all your ingredients except the lemon zest into a saucepan and melt on low heat, stirring constantly.
  2. Once the sugar has melted, slowly bring the mix to boil and it will thicken.  Once that happens, turn off the heat.

Back to Cake Method

  1. Sprinkle half of the lemon zest over the cake batter in the tin.
  2. Pour the lemon custard over the cake batter.
  3. Cut up the remaining cake batter into teaspoon sizes and drop them onto the custard to cover evenly.

  4. Sprinkle the rest of the lemon zest over the cake and pop it into the oven set at 180 deg C for 30 mins. (I lowered the heat after 15 minutes to 175 dec C because the top of the cake looked very brown. :))
  5. Cool in the tin.
  6. Remove from tin, sprinkle icing sugar on top, and then serve with tea.  Yums!


The fragrance of this cake while baking is wow!  The whole house is filled with its scent. :)
The cake is crumbly, sticky and parts of it crunchy... what a mouthful of texture and goodness!

So friends,
When life gives you lemons, don't despair!
Make this luscious lemon cake to share -
Your woes are halved, your blessings doubled,
When friends share your lemons and your trouble.

Wednesday, 25 May 2011

I Can Eat A Rainbow!


Why are there so many, songs about Rainbows and what's on the other siiiiiiiiiide?

Perhaps it's because rainbows are one of the most uplifting, joyful images we have. =)

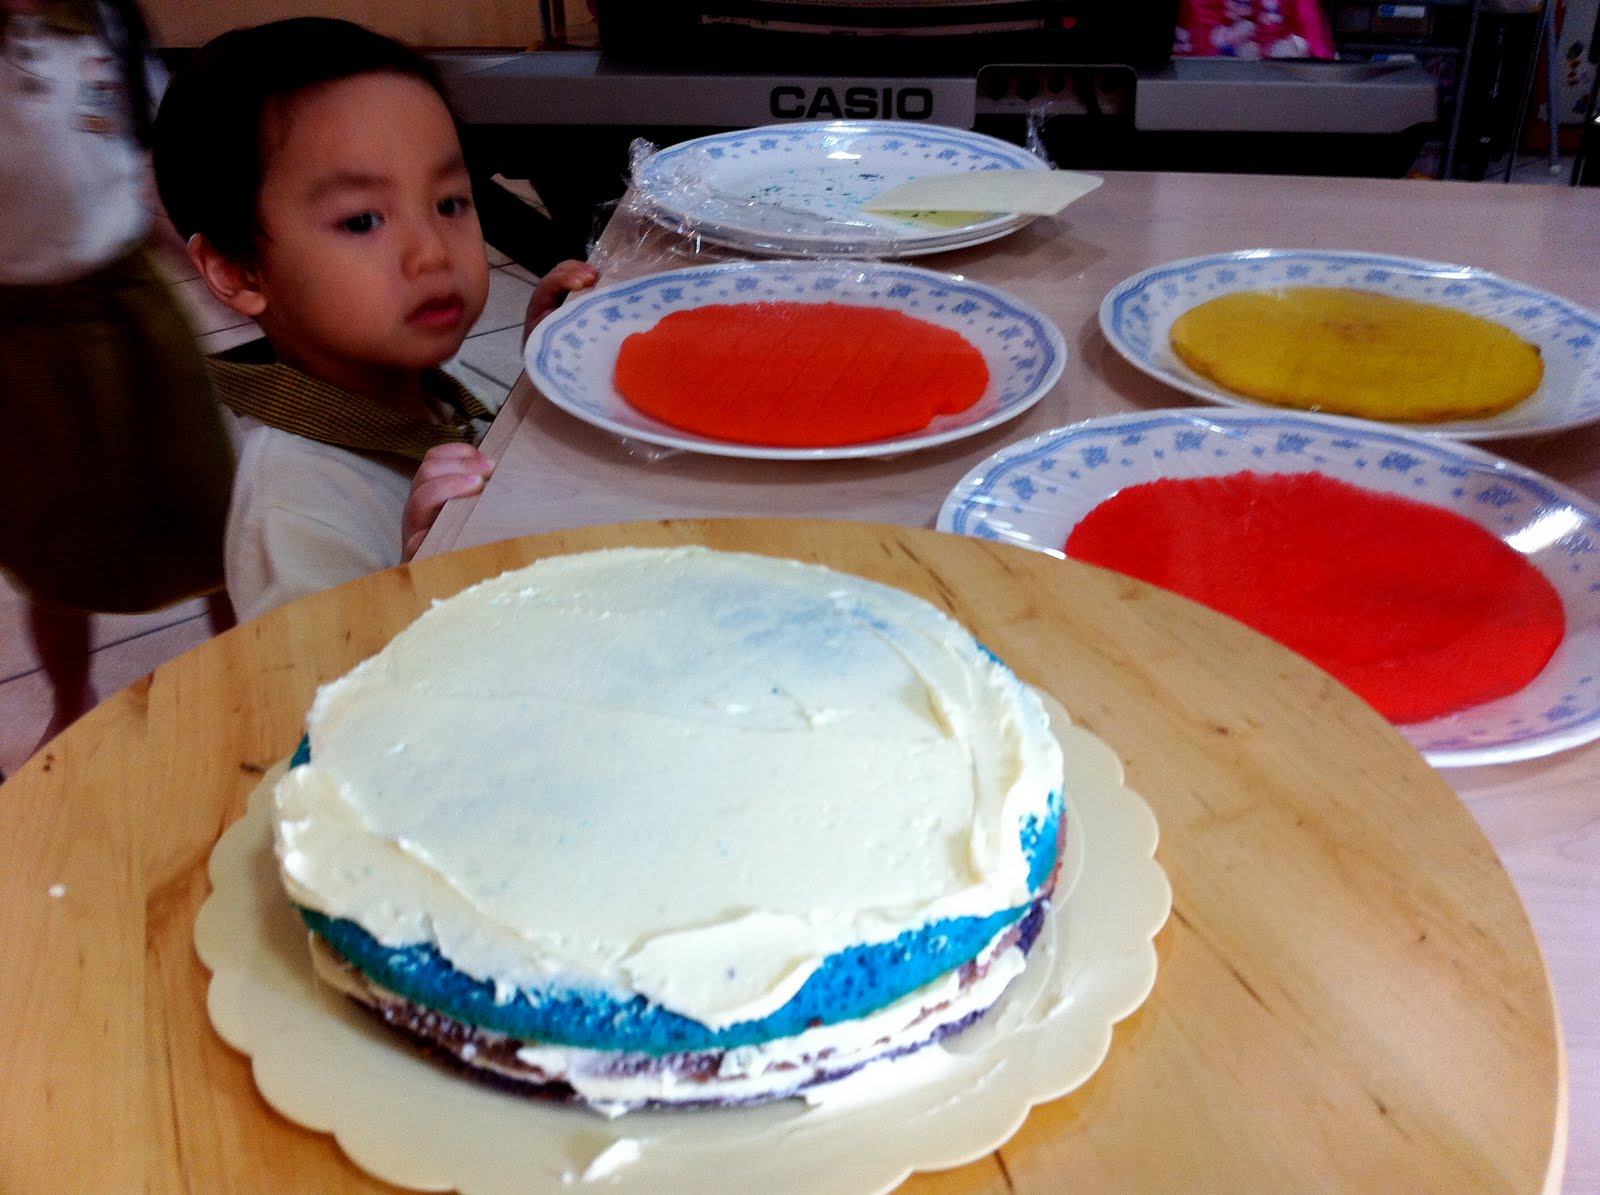
When I was volunteering at no. 3's class to teach the pre-nursery kids to play with their food (;P), I promised the class that I would make them a rainbow cake.  The night before, I made friends with a lovely lady, Selphie, who blogged about making a Rainbow Cake.  Instantly, I was inspired to try my hand at this.  After all, the premise was simple - tinting the cake batter and then assembling it - but the effect! Wow!

In the interim period, some of no. 3's friends would remind me of my promise whenever I go to the school to fetch no. 2 & 3.  Since this was the last week of school, I decided to get this done, otherwise they would probably forget about the whole idea of eating a rainbow! ;)

I would have used a cake mix for this in a pinch, but I didn't quite have the time this week to hit the stores.  Therefore, I googled for a simple cake mix, and this one had good reviews.  In addition, what I like about this recipe is that I needn't separate the eggs.  For me, simplicity is key! ;)

I knew that a 7-layer cake would be quite tall if I doubled the basic cake recipe, so I went for 1.5 times the recipe.  In all, the cake was a good size to share with a class of 10 preschoolers and their teachers.

The Vanilla* Cake Recipe
* I use Vanilla extract here, but I suppose you can substitute it for any essence you like.  No. 1 is already thinking of mango or lemon... ;P
Ingredients

300 g white sugar
170 g butter
3 eggs
15 ml vanilla extract
280 g all-purpose flour (sifted together with the baking powder)
10 g baking powder
180 ml milk
Red, Yellow and Blue Wilton Food Colouring Gel

Method


  1. In a medium bowl, cream together the sugar and butter until the butter lightens.  This would take about 8 minutes.
  2. Add in the eggs one at a time, creaming each one well after cracking it in.  Scrape down, mix, and then crack in the next egg.
  3. Add in the vanilla extract. (Or any other substitute.)
  4. Make 3 batches of the flour mix and 2 batches of the milk.  Add in the flour to the cream mix first, followed by milk, flour, milk and finally flour.  At each addition, make sure to mix it well.
  5. Being one of those needing exact measurement, I weighed out the cake batter - 1073g - and divided it up into 7 portions - about 153g each portion.

  6. Using the 3 primary colours, add enough gel paste to colour the portions Red, Orange, Yellow, Green, Blue, Violet and Indigo (Dark Purple).
  7. Line and grease 2 or 3 8-inch cake pans and bake them in a 165 degC oven for 15 minutes.  Once the cake is done, turn it out onto a cake rack, and reline the cake pan for the next layer.
  8. Allow all the cake layers to cool before frosting.
Because I baked the night before frosting, I placed each layer of cake on a dinner plate, covered it with a plastic food wrap and put it in the fridge overnight.

Assembling the cake
I used the butter-cream cheese frosting that I've posted before, but used vanilla extract instead of strawberry, in order not to clash with the vanilla cake.
  1. Starting from the indigo layer, use about 1 heaped tablespoon of the frosting to coat the layer before placing the violet layer on.  Do likewise to the violet layer all the way until you get to the red layer.  While frosting the layers, take care to 'fill-in' the sides, especially if your cake layers are like mine, tapering off at the sides.

    Building upwards...

    Frosting, frosting...
    And building upwards...
    until the last layer...
    Of course, frost the final red layer and sides before putting it in the fridge. =)

  2. Once the cake has a frosted coat, return it into the freezer to harden before frosting the cake proper.
I toyed with the idea of making a fluffy looking frosting that is cloud-like, but because of time (I had to tie no. 2 hair for school!!!) I kept the frosting simple.
My cakeboard was sufficiently 'cloud-like' with the scalloped edge. ;P

At the school, I talked to the preschoolers (3-year-olds) about the colours they see in the sky - blue, pinks and black - and the colours of clouds.  We talked about favourite colours and those that can be found in a rainbow... and then I cut a slice out and their eyes literally widened! =)


We didn't do this, but I suppose we could have sung:
Red and yellow and pink and green
Purple and orange and blue
I can EAT a rainbow, 
EAT a rainbow, 
EAT a rainbow too.

=)

Tuesday, 17 May 2011

DIY Pizza Party!

Individual DIY Pizzas made by my guests


DIY Pizza Party is easy to do... and when you've got a perfect recipe for homemade pizza dough, things are so much simpler! =)

Brenda's Pizza Dough:
Ingredients:
500g Plain Flour, sifted
1 sachet Instant Yeast
300ml Lukewarm Water
1 tsp Salt
1 tsp dried Oregano
1 tsp Garlic Powder
Olive Oil

Method:
  1. Mix the yeast in the water with 3 tablespoons of the sifted flour. Set it aside for 15 minutes for the yeast to activate.
  2. In a bowl add the oregano, garlic powder and salt to the flour. Make a well in the flour and pour the activated yeast mixture in.  The activated yeast mixture should smell yeasty and look foamy.  Use a spoon to mix the flour with the liquid so that it comes together as a dough.
  3. Turn it out onto a floured table, and knead the dough for 10 minutes. This part is an excellent arm workout! ;)
  4. Shape it into a ball and coat it *thinly* with olive oil. I pour out about a teaspoon of the olive oil in my hand, and then lightly cover the dough with it.
  5. Leave the dough in a bowl to double its size. Cover the bowl with a towel and put it aside for about 1 hour.
  6. Punch down the dough, and weigh out about 110g of dough for each serving. Roll out circles (or something like circles ;)) on cut-out baking paper, so that each person can have their own pizza to put their favourite toppings on. =)  Each dough recipe should make about 7 or 8 smaller pieces.


Brenda's Homemade Pizza Sauce:
Ingredients:
2 large tomatoes
1 large onion
a handful of fresh basil leaves
3 cloves of garlic
a little pepper

1 small can of tomato paste
1 tablespoon of olive oil for frying

Method:
  1. Blend all the ingredients together, except for the tomato paste.
  2. In a saucepan, heat up the olive oil.  Add in the blended ingredients to the oil and fry until some of the fragrance is released.  Add in the tomato paste and heat it up until it bubbles and come together.
  3. Allow the sauce to cool before use.

Pizza Sauce, and other favourite toppings: Ham, pastrami, onions, capsicums, egg, basil...
...baby spinach, olives, cherry tomatoes, mushrooms, pineapple slices, mozzarella and cheddar cheese... 


Adding a raw egg on the pizza is Pizza alla Bismark. 


Into a preheated oven set at 220 deg C for 15 minutes
DIY pizza parties tend to get my guests excited because for some of them, it's a fun way for some creative cooking expression.  For others, it's a good way to avoid foods they don't enjoy, but don't have to worry about whether their avoidance of certain items might lessen another person's enjoyment of it.  For kids, they pile on their favourites with no worries about that yucky stray pineapple slice that seems to hide under a mozzarella because they can simply not put that in! :)


Of course, among my guests, many were only too happy to share a slice of their pizza version with another, and it certainly adds to the overall conversation and atmosphere.


Along with the pizzas, I also serve a cream soup; in this case, my cream of mushroom soup.


Have fun at your own pizza party! =)

Saturday, 23 April 2011

Kiwi & Strawberry Meringue Nests


Meringue Nests are so simple and easy to make, and such a delight to eat.

The fruit possibilities are endless, and this dessert is so simple to make and refrigerate before guests arrive.

Swiss Meringue
Ingredients:
90g Egg White, room temperature
175g Sugar
1/2 tsp Cream of Tartar
1 tsp Vanilla Extract

Method:

  1. Boil a pot of water and keep it at just below boiling heat.
  2. Put a metal bowl on the water in the pot.  Put in all the ingredients and beat the mixture using an electric beater on low until all the sugar dissolves.  This will take about 3 minutes.
  3. Remove the metal bowl with the mixture from the pot, add the vanilla extract, and then continue to beat the egg whites on high speed for another 10 minutes.  You'll need to get to a point where the egg whites are glossy white and stiff.
  4. Transfer the egg white into a piping bag.  On a baking parchment's reverse side, use a tea-cup to draw round circles with a pencil.  Carefully pipe a base starting from the centre of the circle outwards.
  5. Complete all the circles, and then pipe the sides up to make a container or nest.

  1. Bake in a pre-heated oven at 100 deg C for 75 minutes, and leave it in the oven for another hour.
  2. Store in an air-tight ziplock bag until needed.
I had initally used my previous meringue cookie recipe, but I was intrigued by the Swiss Meringue method of heating the egg white and sugar to achieve a smoother and lighter meringue, which indeed makes a slight difference to the texture.  That said, the French method of just beating the egg whites and sugar without heating it up is simpler, and the crunchier texture will contrasts well with the whipped cream too.  I suppose the choice of methods is really up to you. :)

Anyway, to assemble the Meringue Nest is as simple as whipping up some whipped cream with a little sugar to taste and spooning a tablespoon or two into the nests, cutting up some seasonal fruits (or fruits on offer at the supermarket ;) ) and arranging it prettily in the nests, and refrigerating them until dessert time.

The effect of this dessert when presented is almost always a look of surprise and lit-up eyes.  It's really worth the look of joy on their faces when it's really a simple dessert to assemble.

A word of warning though - this dessert cannot be kept overnight.  The meringue nest will soften.  Therefore, make the meringue last - just before your guests arrive - to put into the fridge.  That way, the meringue will remain crisp. :)


8 Oct 2011, Edited to add:
Since the time I made this meringue, I've purchased a Kitchenaid (KA).  Naturally, I wasn't able to use a hand-held mixer to beat the egg white over the hot water.

Therefore, what I did is to do a modification based on the Swiss Meringue Buttercream.

To my 2 egg whites (about 70g), I used almost double that amount for sugar (about 138g), 1/4 teaspoons of Cream of Tartar and 1 teaspoon of vanilla extract, and all these I put into the KA bowl, and heat it up over boiling water, all the while stirring it with a whisk.  I did this until the sugar dissolved into the mix, and then put it on the KA to beat on low speed for about a minute, then on high speed for about 6 to 8; when it more than doubled its volume.

I made smaller nests this round, because the initial eggwhite amount is smaller (70g, compared to previously 90g).  But again, the meringue nests are really a very simple and easy dessert to make. ;)

14 Feb 2012, Edited to add:


I've tinted the meringue with a little red gel food colouring to get pink nests for a Valentine's Day dessert.

Also, because of time, I've made a larger pie-like nest instead of individual nests for the adults at the dinner to share.  The kids got mini ones all to themselves.  I piped the words with Nutella. ;)

Wednesday, 13 April 2011

My Little Helper

Who needs soap-and-water when you've got a little volunteer to lick up your beaters? ;)

Wednesday, 23 March 2011

"Instant" Cream of Mushroom Soup


NTUC had a sale on sliced button mushroom... S$2.10 per pack of 200g. And with Edna bugging me to make "her favourite mushroom soup", it was a good opportunity to make the soup.

INGREDIENTS:
400g Fresh button mushroom, chopped, but reserve about 50g and set aside.
1 tablespoon Butter
1 tablespoon Flour
1 large Onion, chopped
2 stalks Celery, chopped
2 cloves Garlic, chopped
2 cups Fresh Milk
1L Water
1 Chicken Cube (or Vegetable cube if vegetarian)
Salt and Pepper to taste

METHOD:
1. Heat up butter in a pot, and add flour to it when melted. Stir it until you get a yellow ball, then add in the onion, celery and garlic and fry for about 2 minutes.
2. Add in the milk and stir to thicken, then add in the mushroom and let it simmer for a minute.
3. Add in half the water and wait for mushroom to soften - about two minutes.
4. Remove the entire soup and put it into a blender. Or if you have a hand-held blender, that works well too.
5. Return the blended soup into the pot and add in the rest of the water to dilute it to your preference. Add in the reserved chopped mushroom to give the soup more texture.
6. Add salt and pepper to taste.
7. Serve with grated cheese as garnish.

If you make it in a thermal pot, you can put the completed soup into the outer pot until needed.

The soup's so fast and easy to make that we don't buy instant soup anymore. ;)

Slurrrrrp!

"My favourite soup! It's already my second bowl of soup!"